Pages

Another sweet family (Child and family photography, Twin Cities, Minneapolis St. Paul, MN}

I have another sweet and beautiful family session to share.  This night was touch and go as far as the weather was concerned, but we decided to go for it and I'm so glad we did!  I think the location we chose was the only spot in the Twin Cities metro where it wasn't raining.  And the overcast night made for some beautiful, dramatic color for them.  I love how these turned out.

And five minutes after I left the session, as I was driving home, it started to pour outside.  (At that very moment, "Here Comes the Rain Again," by the Eurythmics, came on the radio.  Why yes, I do listen to KOOL-108, why do you ask?)

So it was a perfect night.  I absolutely loved spending time with them.   They are beautiful: inside, out, and otherwise.

Thank you for looking!  For session details and to see my complete portfolio, click here.  

To contact me about your own session in the studio or on-location, click here.  

If you like my work, like me on facebook.


Sweet Family. {Family Photography | Twin Cities, Minneapolis St. Paul, MN}

I met up with this lovely, sweet family at my studio in Burnsville, MN and we had so much fun!  Those two little girls just melted my heart.  I got the biggest, sweetest hug when we were finished and that just make my night.

We started out inside the studio.  I love their outfits and everything about their genuine joy at being together.

Then we stepped out back for some more shots.  It had been sprinkling off and on all afternoon but just as we walked out back, the sun started peeking out and in a few minutes we had the most beautiful glow out there!  These turned out so beautiful.

Grandmother and Grandfather came along, too.

Thank you for looking!  For session details and to see my complete portfolio, click here.  

To contact me about your own session in the studio or on-location, click here.

If you like my work, like me on facebook.

Allie. {High School Senior Photography | Twin Cities, Minneapolis St. Paul, MN}

I could photograph this senior girl all day long.  In fact, that's exactly what I tried to do!  But, eventually, my memory cards filled up, my battery died, and she got thirsty, so I had to stop.

Thank you, Allie, for being so wonderfully beautiful, both inside AND out.  I had the best time taking your senior pictures!

Thank you for looking!  For session details and to see my complete portfolio, click here.  

To contact me about your own session in the studio or on-location, click here.

If you like my work, like me on facebook.


Senior guy and family {Senior and family photography | Twin Cities, Minneapolis St. Paul, MN}

I had another session for a senior guy and his family, and it was great!  We had beautiful Lake Minnetonka (and more) as our backdrop.


Thank you for looking!  For session details and to see my complete portfolio, click here.  

To contact me about your own session in the studio or on-location, click here.

If you like my work, like me on facebook.

ArcSoft Portrait+ Review

My blog is usually reserved for client work and client-related posts, but this time, I'm posting for my photographer colleagues.

A few weeks ago I was asked by the ArcSoft company to review their newest portrait retouching program, Portrait+. This program looked quite different from others I've used, and I was really excited and honored to do this review for them.

At the bottom of my review is a coupon code for purchasing Portrait+ for 45% off.

I have been using Portrait+ as a plugin with Photoshop CS5.5.

The first thing that struck me when using Portrait+ is its ease of use.  It is the most intuitive and simple-to-use program I've ever worked with.  I love having full control over my edits and I admit I wondered how much I would enjoy using an "auto" retouching system but I was very pleasantly surprised at just how customizable the features really are, while still being so easy to figure out and lightning fast.

There are two main panels, one for presets, and one for custom edits.  Both are ridiculously simple to use, you simply turn the features on and off.  There are several presets already made, and there is also the option to turn a custom edit you've made into a preset for batch editing within a session, and literally apply several steps of retouching to a whole set of images in just one click.  Load all the images and click your preset.  Done.  During busy season, saving this kind of time is incredible!  And can you imagine being able to do that with a wedding?
Here is a screenshot of the preset panel - you can see that I've added a few of my own presets at the top, from sessions I was working on.   I wish I'd kept track of how much time those presets saved me in editing those particular sessions!  I will get into making presets a little more, below (but again, it is extremely easy.  One-click easy!).

Preset panel:


The face detection in Portrait+ is extremely accurate.  And even then, there is an option to check the detected face area and erase spots that you don't want retouched.  Portrait+ can detect eyes, teeth, cheeks, noses and lips and manipulate and work with them extremely accurately, too.  It is quite astonishing.  (More on that below.)

Here is a simple edit I made using a custom preset - Smoothing + Maintain Freckles.  The "before" image is on the left, and on the right is the edit after applying the preset in one click:

Left: Before | Right: Smoothing + Maintain Freckles Preset, low setting (25):

I like a very natural look, so I applied the preset at the "low" setting.  And you can see that even at that setting the skin is very smooth, and the only freckles maintained are her bigger ones.  So personally, I might lower it even more (there is a slider for adjusting the effect to your taste), or make a duplicate layer in Photoshop, run Portrait+, and then create a layer mask and lightly paint back the freckles (I love freckles!) or lower the layer's opacity a bit.

In Portrait+ you can view your before and after images side by side, and I really liked being able to do that.

Here is the same image with a custom preset I made.  I could easily load all the images from her session into Portrait+ and click once to apply the preset to all of them.  However, since I like the natural look and a little more control, I decided to make a duplicate layer and apply my preset, then lower the opacity of the layer a little to tone it down a little, even with the settings on "low."

Left: before | Right: Custom edit: undereye circles, eye brightening and skin smoothing, low settings, with reduced opacity of the photoshop layer.

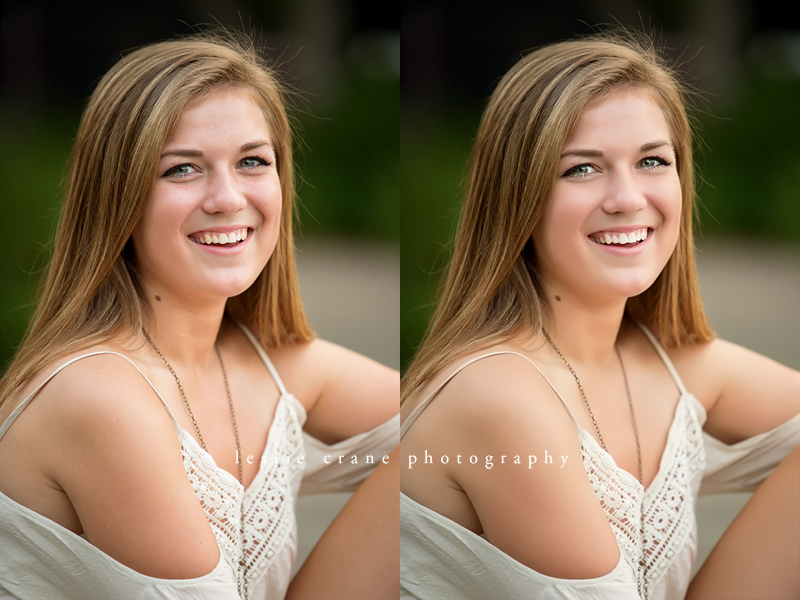
Here is a one-click edit, again with a reduced-opacity duplicate layer in photoshop:

Left: Before | Right: Skin smoothing, skin brightening, undereye circles, eye brightening, teeth whitening, all on low settings, with reduced opacity of the photoshop layer.  Her teeth were already white so it didn't do much there but the teeth whitening feature really does work.


Here is a much heavier edit - more than I would normally do for a senior girl, but this is for the sake of demonstration.  It was fast, simple, and effective.  


Left: Before | Right: After: Skin smoothing (30), undereye circles, skin brightening (14), eye brightening (high), teeth whitening, and shine removal.

Portrait+ will detect multiple faces in an image.  I used it on a session with a family of eight!  And if you prefer to retouch only some members of the group, you can use the lock feature to prevent certain faces from having the effects applied to them.

One feature I was excited about was the auto blemish removal.  I shoot a lot of high school senior sessions, so getting rid of blemishes in one click seemed like a dream come true!  I found that it worked very well on smaller blemishes, but it missed the larger ones, and even the manual tool wasn't as effective as I'd liked.  That might be an area for improvement in the next version of Portrait+.  Or maybe I'm just dreaming too big! 

Here, now, is the custom edit panel in Portrait+.  From these effects you can create your own presets which will show up in the preset panel.  You can see that there a lot of features available!  To use one, click the switch to "on" and use the arrow to expand the edit features and make your adjustment using the sliders, to taste.  It is very intuitive and very easy to figure out.  And once you make an edit, if you want to make it into a preset to apply to a large number of images from the same session, just click "Save as Preset," give it a name, and it will show up in the preset panel.

Custom edit panel:


I don't often have a need for manipulating faces in my portrait edits.  Portrait+ will slim a face, enlarge eyes, and more, but I don't think I'd use those features.  However, once in a great while I have a serious toddler amidst a smiling family... and I could use Portrait+ to deepen that smile a bit and lift the cheeks.

Her tiny smile was really just fine, but if I wanted to make it bigger I could do that easily with Portrait+.  Just click (I used the "deepen smile" and "lift cheeks" buttons) and use the sliders to increase the amount to taste.

Before:

After: undereye circles, deepen smile (medium setting), lift cheeks:

This is a picture I took when I was first learning studio light.  My lighting was not as soft, beautiful or flattering to my subject as it could have been, unfortunately.  I don't ever recommend using software to "save" an image, but in this case, I was able to improve it a lot.


Left: Before | Right: skin smoothing (25), undereye circles, eye brighten, remove shine, on a duplicate photoshop layer with opacity reduced to 70%:


Portrait+ also has digital makeup.  Now I prefer to use a living, breathing makeup artist whenever possible, but for the sake of demonstration, I've added some digital makeup to the above retouched image.  I think with a more "fantasy" image, or something more extreme than what I do, the digital makeup features could be really fun.  The colors are fully customizable and there are many, many choices for eyelashes, eyeliner, blush, colored contacts, and more.


Here is the custom edit panel with the makeup features open, and the eye shadow tool expanded:

And my edit.  I tried to keep it understated here.  But it was really shocking how I could just click one button and Portrait+ would know exactly where to place the false eyelashes and the eyeliner.  Like I said, the face and facial feature detection is very powerful!

Left: retouched image from above | Right: fun with digital makeup - eyebrows, eyelashes, eyeliner, eye shadow, lipstick, blush:

I've only scratched the surface of what this program can do, but these are the ways I can use Portrait+ within my own work and style, which are pretty simple and clean.  For a wedding photographer, I can see this being very handy and saving hours and hours of retouching work.  Also, for glamour and commercial work, some of the enhancements available would be really fun to use.


Here is my quick list of Portrait+ Pros and Cons:

PROS:
Ridiculously easy to use - I read no manual, looked at no instructions at all, and found it incredibly intuitive
Presets - HUGE time saver on whole sessions, especially when batch editing
The face detection is amazing
It works, and works well

CONS:
Blemish removal - not as effective as I'd hoped, though it does work well on small and minor skin blemishes
Skin smoothing is a little heavy-handed for the type of editing I do, but this is easily remedied by running Portrait+ it on its own layer in Photoshop and reducing the layer's opacity
It's expensive (though you can get 45% off with the coupon code below), but when you weigh that against the time you save, especially during busy season, it could easily be worth it

BOTTOM LINE:
I do highly recommend it.  I have really loved using it, and the time I've saved with it has been worth so much!  


As promised, here is a coupon code for purchasing Portrait+: Portrait45

With that code you can save 45% on your purchase.  Click here to visit ArcSoft's Portrait+ page, or to purchase it.

Thanks for reading!


Lot of cute cousins {Family photography | Twin Cities, Minneapolis St. Paul, MN}

I'm getting a little behind with my blog, so I thought I would post three sessions that had a common theme: cousins!  I have had so much fun, lately, photographing families that are visiting one another from far apart.  For some reason that kind of session has been really popular this year, and I love it.  In fact, I've not been able to take on all the requests I've gotten for sessions of this kind this season, simply due to being so booked up.

Anyway, here are three sessions featuring some ADORABLE cousins who were so excited to be together.  I did get to photograph some of the parents and grandparents, too, but as I said, I am sticking with a cousins theme here, soooooooo... darling youngsters it is.

This first session featured 7 girls, all in matching dresses!  Three of the girls stuck around a little longer and I photographed them in the studio, too.
Next, we have some beautiful cousins who's grandparents happen to live across the street from me.  We decided to do the shoot right in Grandma and Grandpa's backyard.  Easiest commute to work, ever!  They were all going to be together for a rare weekend, so the family booked my services for a photo shoot.
And finally, these two 4-year-old cousins were together for a family visit in St. Paul, and they were so much fun!  I got hugs, I got tickled, I got TACKLED, and I got home-grown tomatoes!  You can't beat that.  They were so funny together.

You may be surprised to hear that after this session I learned that the little boy's mom and I both sang opera at the University of Minnesota back in the 90s and we have lots of friends/colleagues in common.  I KNOW!! AGAIN!!  I am no longer baffled or shocked when this happens.  Because it does.  Regularly.

Thank you for looking!  For session details and to see my complete portfolio, click here.  

To contact me about your own session in the studio or on-location, click here.

If you like my work, like me on facebook.